After receiving very positive feedback to our tutorial on setting up configurable products last week, I am here to present you another tutorial. This time I will guide you through the process of creating a grouped product.
So just to remind you, Magento comes with several preconfigured products. Among these is grouped product. This type of products has been designed to allow product catalogs to be more flexible and efficient.
A grouped product comprises of a two or more simple (or virtual) products. These products can belong to a series of products (e.g. china set or furniture in the same collection) or not have a specific feature in common, but are of similar nature (e.g. an outfit consisting of top, pants and shoes).
Creating a simple product
First you create simple products to your catalog, and then group them so that they are displayed in the catalog together. When customers open a grouped product, they can choose to buy all of the items associated with the grouped product, some or only one of them. You can configure each item can be displayed in the catalog on the frontend separately, or only as a grouped product.
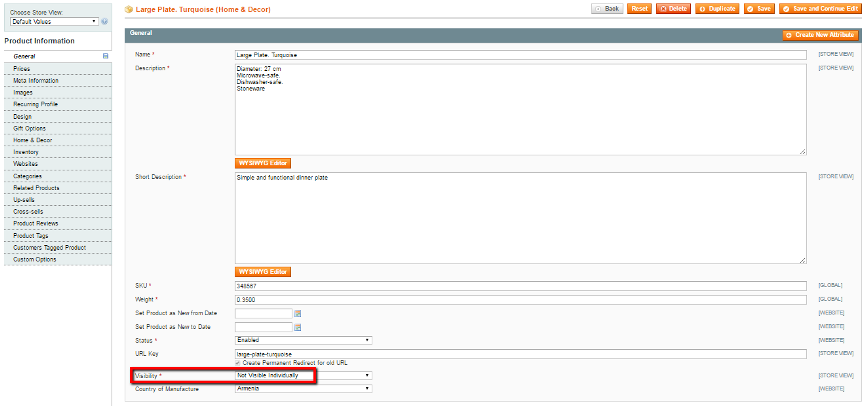
When you create your simple products in Magento Admin Panel and you want them not to be visible as separate items on the frontend, but only as a part of the grouped product, in the General tab set the Visibility option to Not Visible Individually. If you want to keep it visible in Catalog and/or Search on the frontend, select one of these options.
Also, enter the Name, Product Descriptions, SKU and enter the Weight of the product, set Status to Enabled, then enter the basic Price and Tax Class in the Price tab, add an Image and make other settings as usual.

Creating a Grouped Product
Next step is to create the grouped product. Open the hoverable Catalog dropdown menu in the top navigation bar and click on Manage Products. In the page that opens click Add Product button.
In the next page in the Attribute Set drop-down menu select the attribute set you need (in our case, Home & Décor) and select Grouped product in the Product Type drop-down menu. Then press Continue.

Enter information in the Name, Description, SKU fields and select Enabled in the Status drop-down menu in the General tab of the settings of this grouped product.
The difference compared to the simple products will be the absence of Weight field, because the weight is set in each simple product. The Price option is also set in each simple product separately, which is why the Price tab is either absent or has very few options available for configuring. So when customers order one, some or all of the items in the grouped product, the total weight and price will be calculated according to the items selected and their quantity.
Inventory tab also looks somewhat different compared to that for simple products. You do not need to put the quantity of items you have in stock, because the inventory is handled inside each simple product. You choose Yes in Manage Stock drop-down menu. This setting will enable you to change the status of the product to Out of stock manually should you need to. For instance, you may need this option when you do have the product in stock but there is a delivery issue and you do not want the product to be ordered until the problem is fixed, but you still want it to be visible in the catalog so that your customers expect it to be in stock again later.

Next you go to the Associated Products tab to select the simple products that you want to be included in the grouped product. In the bottom part of the page search for the simple products you would like to associate by entering your simple product’s ID number and setting the first drop-down menu to Any. Then when you get the search result, tick the box next to the simple product and press Save. Repeat for other products you want to be associated with your configurable product.
In the Associated Products tab you are able to set the default quantity of each simple product that will be ordered unless the customer makes any changes to the quantity. In Position column you can also set the order, in which the simple products will be displayed in the grouped product on the frontend.
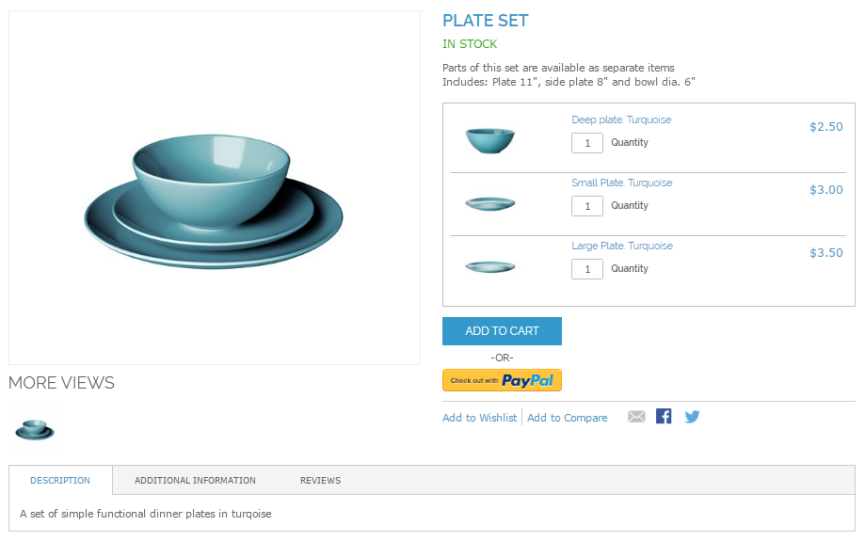
To illustrate the process of setting up a grouped product, I have created a grouped product with three associated products. The default quantity is set to 1 for each simple product, so if the customer does not change it, he will send one unit of each associated product to the shopping cart by pressing Add to cart CTA.

Once you have made all these settings, press Save in the upper right corner.
Now you can go to the frontend and refresh to see the result. There you will see a table with all the simple products including the name, quantity field and price. There will also be an image of all of them together on the left side if you have uploaded one in the grouped product.

Setting Up a Discount for Grouped Purchase
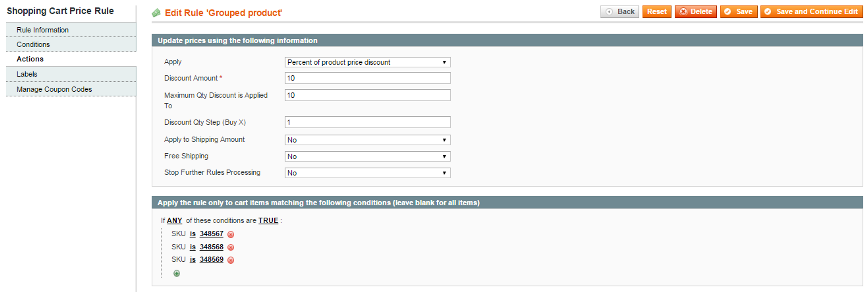
Now, if you are an experienced merchant and you want to entice your customers to buy all three items in the grouped product, you might want to offer a discount. To apply a 10% discount when all three items from the grouped product have been selected, the right way to go is by creating a discount rule.
Under Promotions in top level hoverable menu you select Shopping Cart Price Rules. Here are the Conditions and Actions that will help you set up the discount.


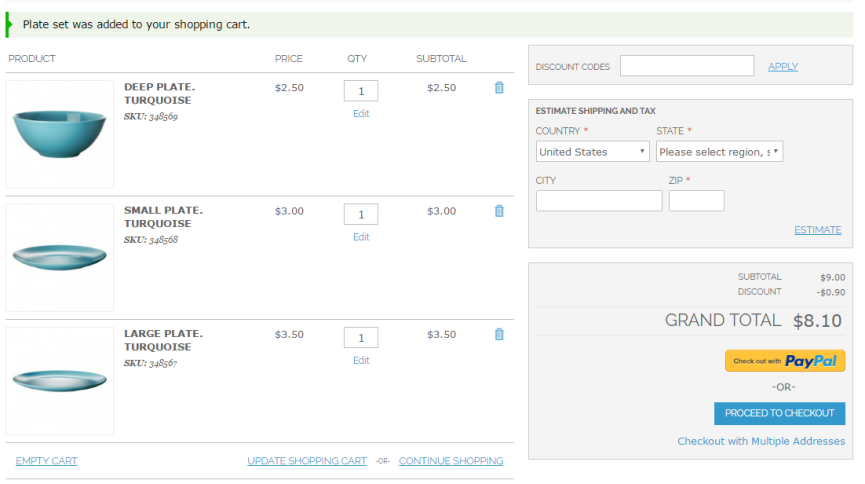
Now when you add all three items from the grouped product you should see the discount applied in the cart:

I hope you are happy with the result! MavenEcommerce team of developers is involved in creating numerous web stores facing complex admin issues on the daily basis. Please don’t hesitate to contact me if you have any questions or simply leave your comments below.
Thanks
Thank you.
You’re very welcome!