Magento is a powerful platform but like pretty much everything in the Universe, it has some narrow spots you may face during the acquaintance with this platform. We’ve collected the most common Magento issues and their solutions to make your life easier.
Troubled with Magento 2? Take a look at “Common Magento 2 Issues and How to Fix Them”
1. Switching from Flash Image Uploader to HTML 5 Uploader
At the beginning of 2021, Flash has officially ended its life. Out of the box, Magento 1 uses an outdated image uploader that is based on Flash technology, and it is no way that your brother will support it from now. To overcome this Magento issue, we developed an extension that makes a life of a merchant much easier. Our solution is based on HTML5 technology, which is modern, stable, and won’t get outdated in the nearest future, so you won’t be forced to look for another solution for a long time.
It’s 100% free, and you can access it directly from our website. Take a look into the details and install Magento HTML 5 Uploader right now.
2. Setting up Magento Website on a New Domain
In order to set up the Magento site on a new domain, you need to do two things:
1) Edit database settings
Go to the cPanel-phpMyAdmin, select your Magento database from the left menu and find the table core_config_data. Click on it and find two fields: web/unsecure/base_url and web/secure/base_url. Click the pen icon and replace the old domain with a new one for both of them. Click the Go button to save changes.
2) Clear cache
Find the cache folder at Magento installation directory – /var/cache and delete its content.
Note: if you delete the entire folder, you may lose the .htaccess file.
3. “Access Denied” Magento Issue
To solve an “Access Denied” issue, you need to log out from the Magento admin panel and then log back in. Then go to System > Permissions > Roles > Administrators and make sure that Resource Access is set to All. Now click Save Role button and the issues will be fixed.
4. Reset/change Magento Admin Password
a) To reset or change the password you need to navigate to phpMyAdmin, select the corresponding database and find admin_user table. Here you can replace the old password with a new one. Make sure your password is in an MD5 function.
Note: Please don’t do that in your live environment! Simple MD5 function is not secure enough.
b) The other way to change the password is to insert the following MySQL query into the SQL tab:
|
1 |
UPDATE admin_user SET password = CONCAT(MD5('xxNewPassword'), ':xx') WHERE username = 'UserName';
|
The ‘xx’ characters is a cryptographic salt. They can be whatever you want but make sure they are the same in both parts of the query. This is more secure than the first variant.
If you have a clean dev/test environment and you want to add a new admin user from scratch, please do the following MySQL queries. It is also useful for updating existing users, e.g. reactivating them and setting a new password.
|
1
2
3
4
5
6
7
8
9
10
11
12
13
14
15
16
17
18
19
20
21
|
#Creating new admin user or updating existing one by username
INSERT INTO admin_user
(email, username, password, is_active)
VALUE
('example@email.com','magento', (SELECT MD5('password')), 1)
ON DUPLICATE KEY UPDATE
username = 'magento', password =(SELECT MD5('password')),is_active=1;
# Creating default admin-user group if not existing. Necessary on clean installation – there’s no Administrators group, thus no permissions can be granted to admin user
INSERT IGNORE INTO admin_role
(parent_id,tree_level,sort_order,role_type,user_id, role_name)
VALUES (
0, 1, 1, 'G', 0, 'Administrators'
);
# Creating our account to access all things in the admin panel
INSERT INTO admin_role
(parent_id,tree_level,sort_order,role_type,user_id,role_name)
VALUES
( 1, 2, 0, 'U',
(SELECT admin_user.user_id FROM admin_user WHERE username = 'magento'),
'Super User'
);
|
5. Adding a Contact form in Magento
A Contact Form is a default Magento feature and, if enabled, there will be a link to it in the footer. But of course, you can add it to any page you want. To do so, log in to the Magento admin area, go to CMS-Pages, select the page you want to edit (or add a new one), and add the following code:
|
1
2
3
|
<!– CONTACT FORM CODE BEGIN–>
{{block type='core/template' name='contactForm' template='contacts/form.phtml'}}
<!– CONTACT FORM CODE END–>
|
Click Save Page and the contact form will appear on that page.

6. Prevent Magento from Logging You Out Too Soon
This one is very easy to solve. Go to System – Configuration – Web – Session Cookie Management – Cookie Lifetime and set the duration to whatever you need.

You also need to change this setting in php.ini – session.gc_maxlifetime and restart the server. Otherwise, the change in Magento admin may not have any effect.
7. Changing Magento Admin URL
To change default Magento URL (/admin/), navigate to app/etc/ and open local.xml file. Find the following code and change the “admin” value.
|
1
2
3
4
5
6
7
8
9
|
<admin>
<routers>
<adminhtml>
<args>
<frontName><![CDATA[admin]]></frontName>
</args>
</adminhtml>
</routers>
</admin>
|
Clear Magento cache, test if new URL is working and make sure that an old one returns 404 code.
8. Get Rid of 503 Error
In most cases, to solve this, go to your Magento root installation, find maintenance.flag file and delete it. If this didn’t work, clear the cache and sessions and try again.
9. Create SEO Friendly URLs in Magento
To get SEO-friendly URLs, so it’s /red-roses.html rather than catalog/product/view/id/12345, you should navigate to System-Configuration.
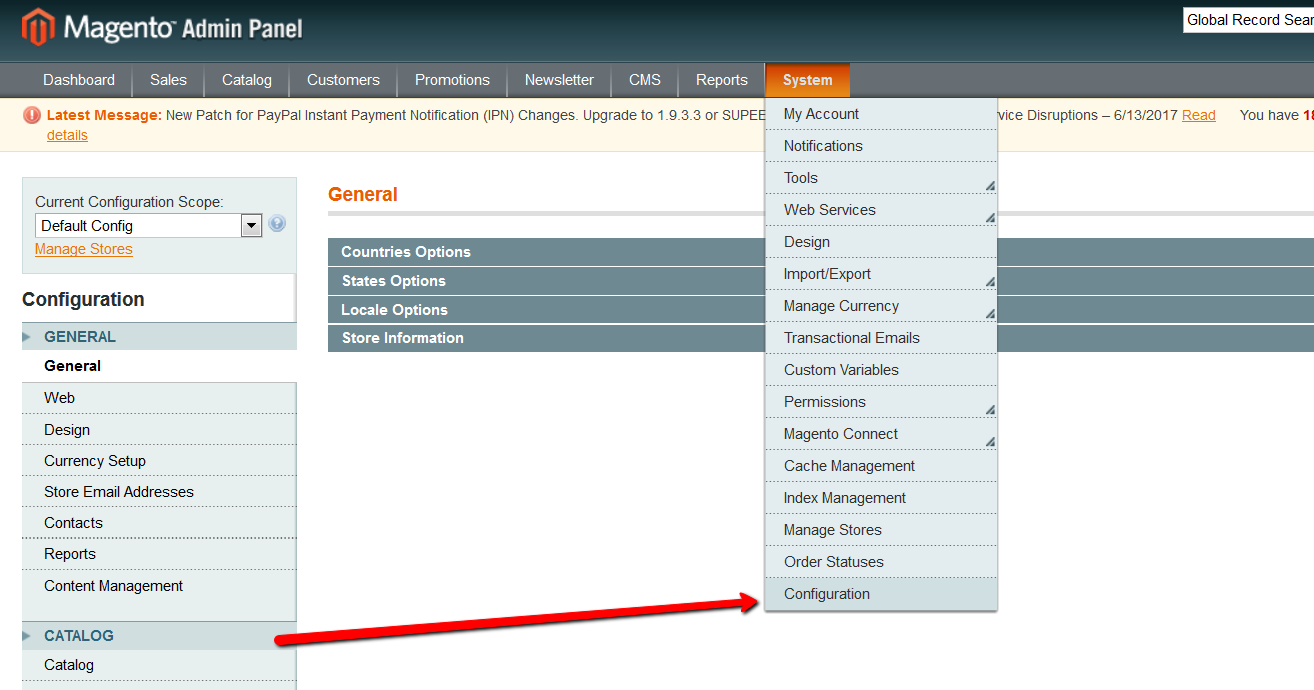
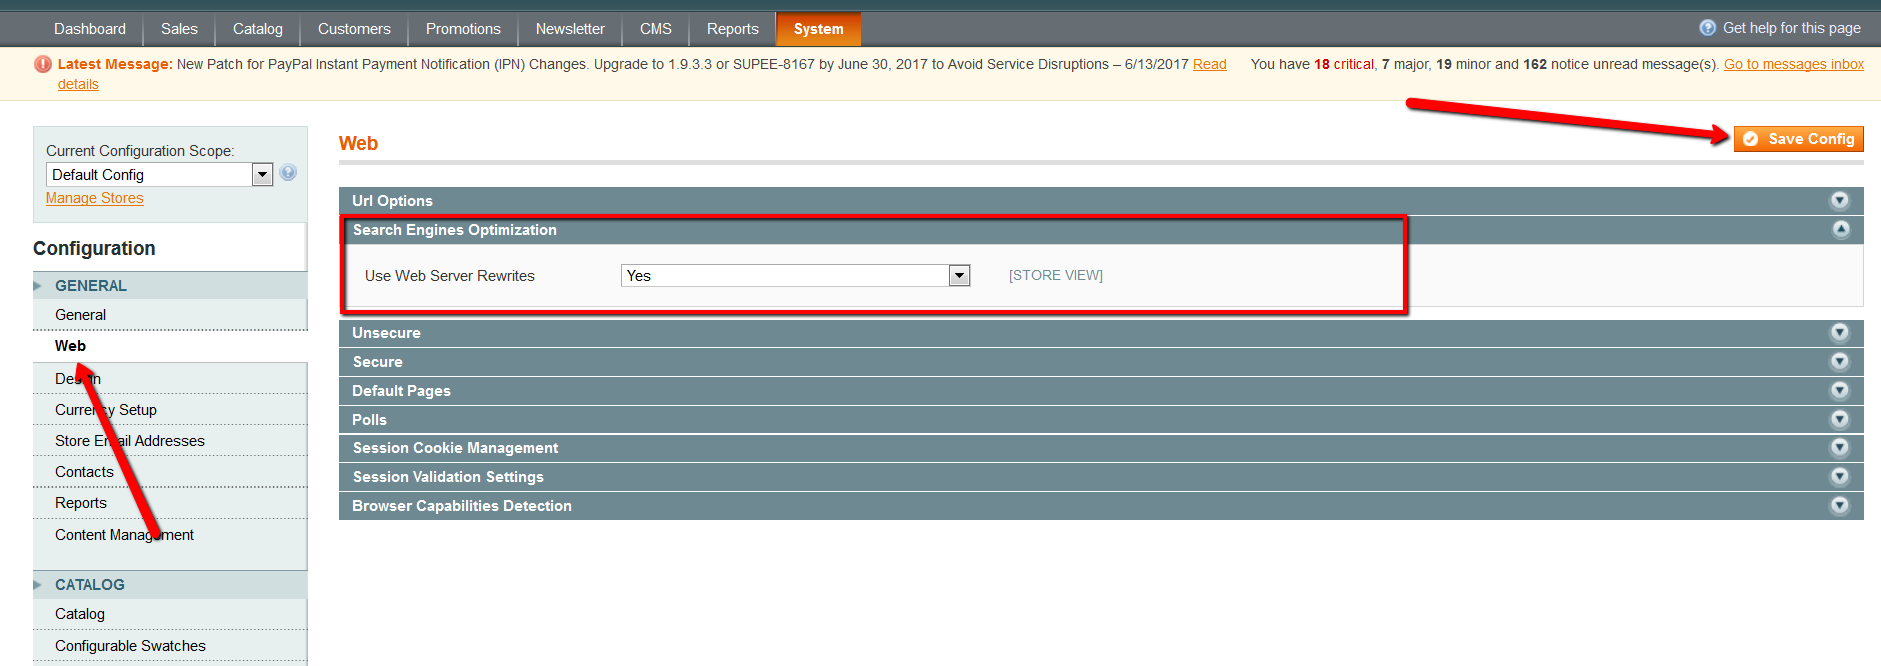
Then select Web from the left navigation menu, set Use Web Server Rewrites to Yes and click Save Config.
Read our Ultimate Magento SEO Checklist to get more insights into SEO.
10. How to set up a blog in Magento
Magento doesn’t have a Blog functionality out-of-the-box so you need to use an extension to add it. You can search Magento Marketplace or Magento Connect for a proper one. If you don’t want to spend time searching, try Blog extension from Aheadworks.
You might also consider choosing WordPress for blogging purposes. Read our previous article to discover the main differences and pain points of both blogging solutions.
After installation, you’ll have an additional section in the top Menu of the Magento admin panel called Blog. You can edit settings and add new blog posts from there.
11. Make Magento open through WWW
According to the SEO best practices, your website should resolve to one URL. And usually, it’s WWW version.
To make your Magento website open through WWW, you need to access .htaccess file which is located in the Magento root. Then search RewriteEngine and insert the following just below:
|
1
2
|
RewriteCond %{HTTP_HOST} ^yourdomain.com$ [NC]
RewriteRule ^(.*)$ http://www.yourdomain.com/$1 [R=301,L]
|
Save the .htaccess file, login to your Magento Admin and navigate to System > Configuration > Web. Unfold the Unsecure tab and change the base URL to http://www.yourdomain.com instead of http://yourdomain.com.
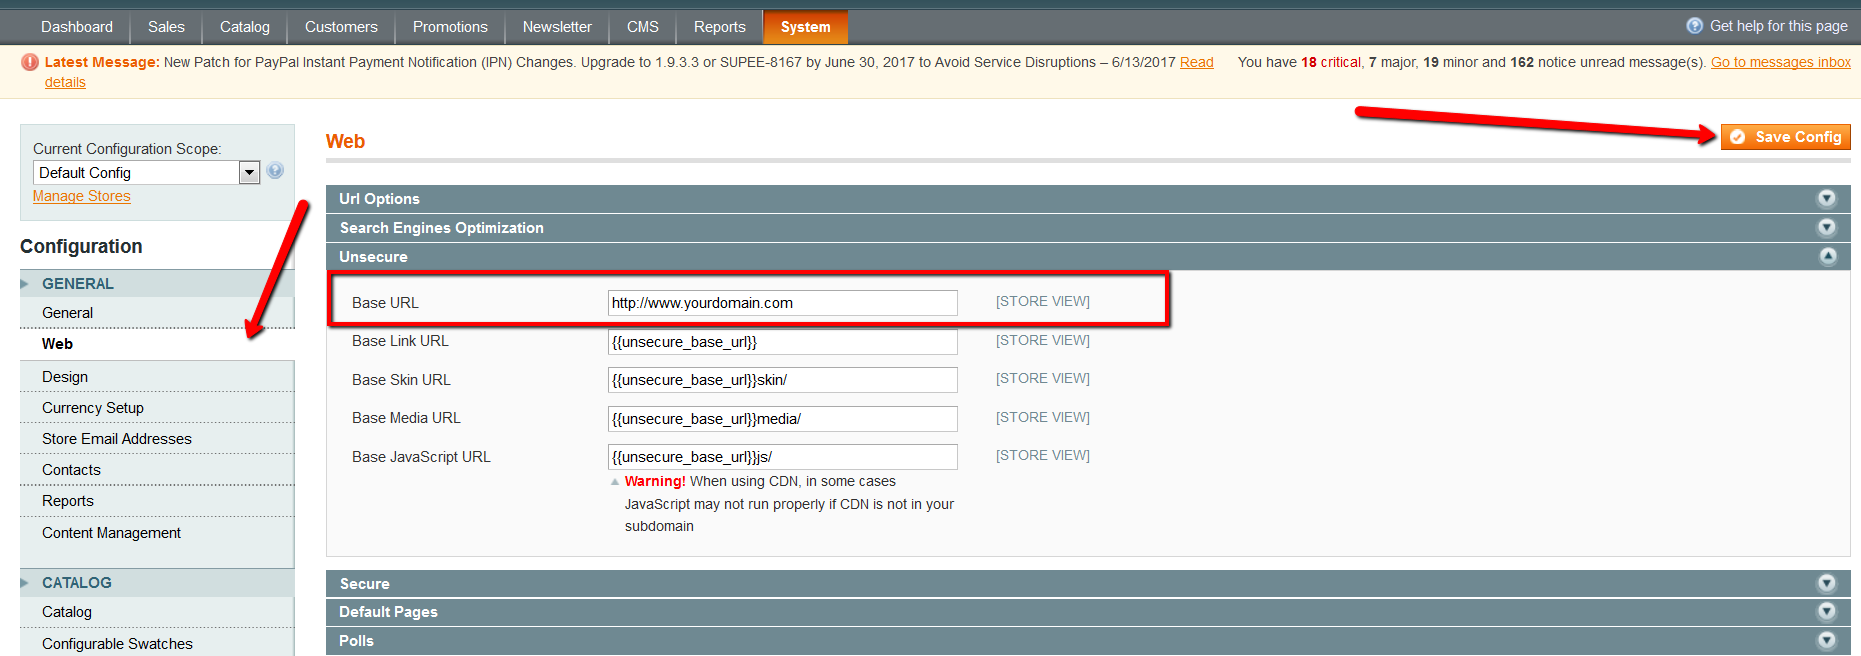
Click Save Config and your Magento store will start working through http://www.yourdomain.com.
12. Disable admin notifications in Magento
Go to Configuration – Advanced – Advanced and disable Mage_AdminNotification.

13. Remove “.html” from Magento URLs
To remove .html from your URLs, go to System – Configuration – Catalog – Search Engine Optimizations and remove .html from Product URL Suffix and Category URL Suffix.
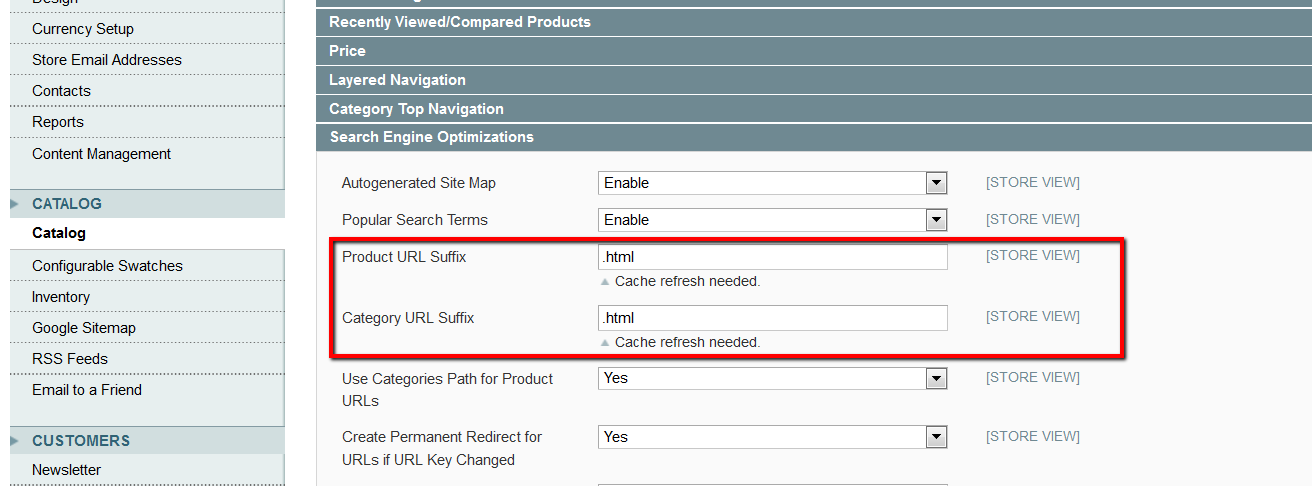
Then go to System – Index Management and reindex all data. Also, don’t forget to flush the cache.
14. How to create 301 redirects
Go to Catalog – URL Rewrite Management and click Add URL Rewrite.
Select Custom from the Create URL Rewrite menu and fill the fields:
- ID Path: enter the old URL (don’t enter the full path. If the URL is example.com/old-url.html, you need to put just old-url.html)
- Request Path: repeat the old URL again
- Target Path: enter the new URL
- Redirect: Choose Permanent (301)
- Save the changes and check if the redirect works.
Related Post: 302 Redirects in Magento
15. How to disable the “Compare products” functionality
To disable compare functionality, go to your Magento root folder, find app/code/core/Mage/Catalog/Helper/Product/Compare.php and replace:
|
1
2
3
4
|
public function getAddUrl($product)
{
return $this->_getUrl(’catalog/product_compare/add’, $this->_getUrlParams($product));
}
|
With
|
1
2
3
4
|
public function getAddUrl($product)
{
//return $this->_getUrl(’catalog/product_compare/add’, $this->_getUrlParams($product)); return false;
}
|
Now you need to find and edit /app/design/frontend/base/default/layout/catalog.xml. Don’t forget to use your theme name if you are not using a default one.
Find the code:
|
1 |
<block type="catalog/product_compare_sidebar" before="cart_sidebar" name="catalog.compare.sidebar" template="catalog/product/compare/sidebar.phtml"/>
|
And replace it with
|
1
2
|
<!-- <block type="catalog/product_compare_sidebar" before="cart_sidebar" name="catalog.compare.sidebar"
template="catalog/product/compare/sidebar.phtml"/> -->
|
Once done, clear the Magento Cache from admin area – System – Cache Management.
16. Create a custom user group and assign a discount
To add a new custom user group, login into the Magento admin panel and navigate to Customers – Customer Groups. Click Add New Customer Group and fill in the required fields.

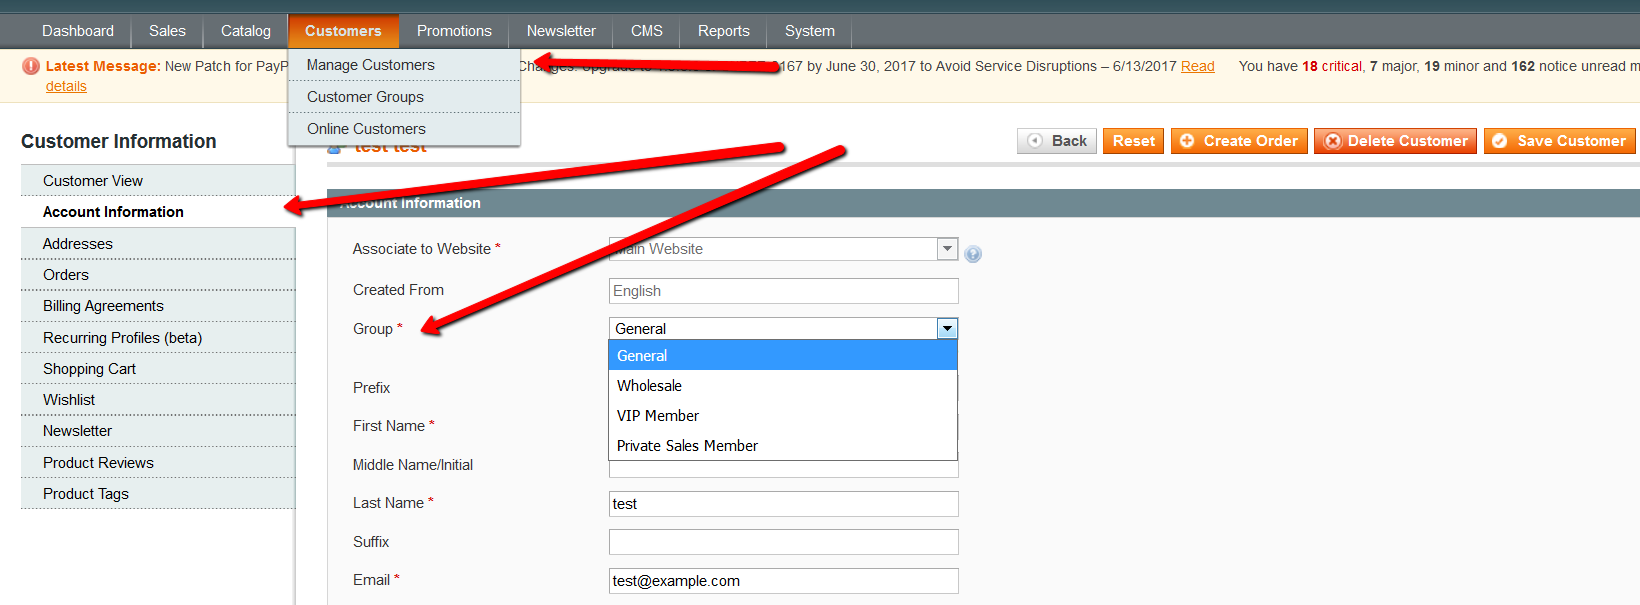
To change the Group for a particular customer, go to Customers – Manage Customers. Navigate to Account Information, select the Group and click Save.
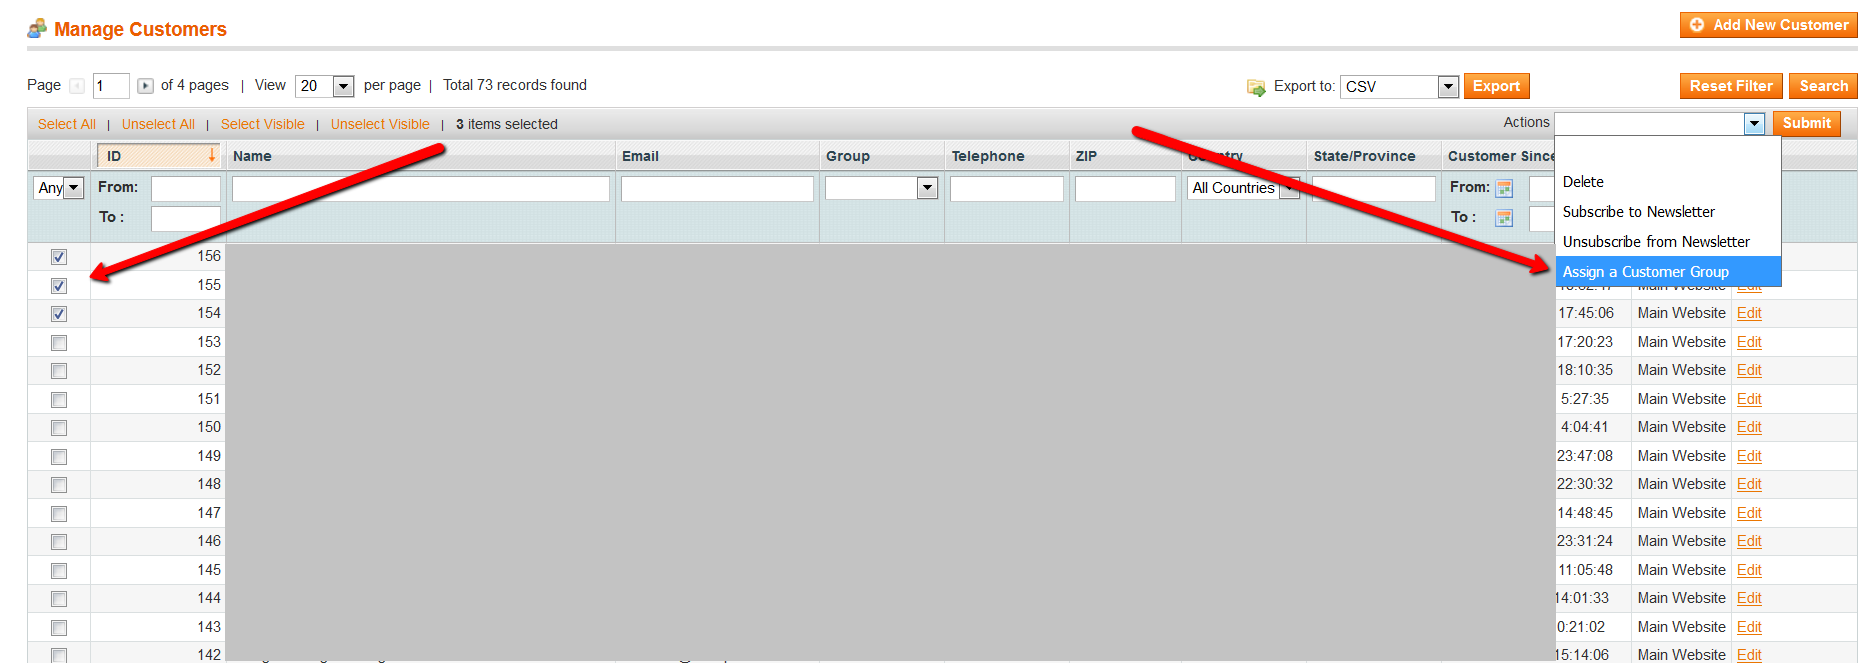
You can also assign customers to groups in bulk.
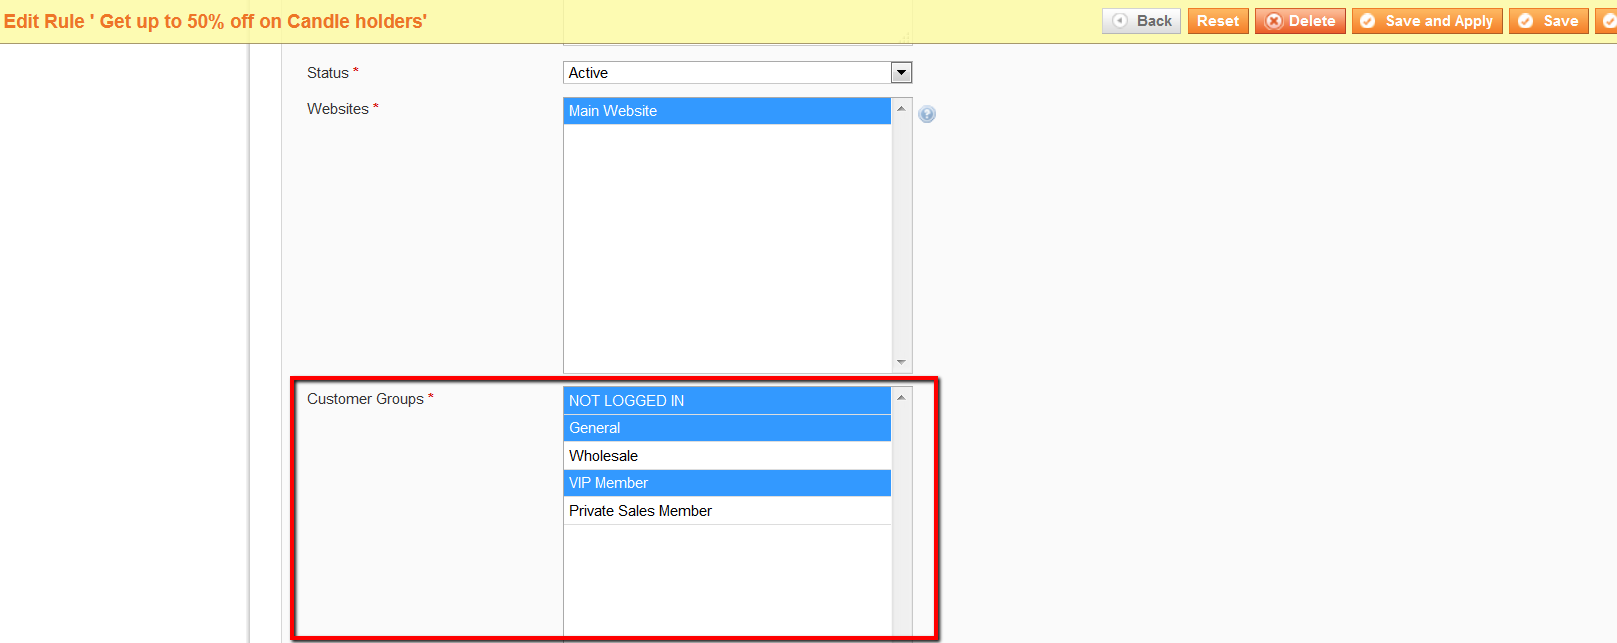
If you need to create a discount for certain Customer Groups, go to Promotions – Catalog Price Rules – Add New Rule. Fill the necessary fields, pick the customers’ group for which the promotion is valid and click Save.
17. Switching off Magento extension
The easiest way is to navigate to System > Configuration > Advanced > Disable modules output and change the status to Disable and click Save Config. This solution is preferred and works in the majority of cases.
If this didn’t help, you can edit the XML file of a certain module. To do so, go to app/etc/modules and find the right XML file. There you should find a line true. Change it to false, save the file and clear cache.
If you couldn’t find such a line, there is one more way to turn off the Magento extension quickly. Go to app/etc/modules, find the XML file you need and rename it. If it was random_extension.xml, rename it to abc_extension.xml.off and clear the cache.
18. Magento categories are not showing on the frontend
There may be several reasons for that. First of all, make sure that all your categories are placed inside the default category. Also, Is Active and Is Anchor (in the Display Settings tab) should be set to Yes.
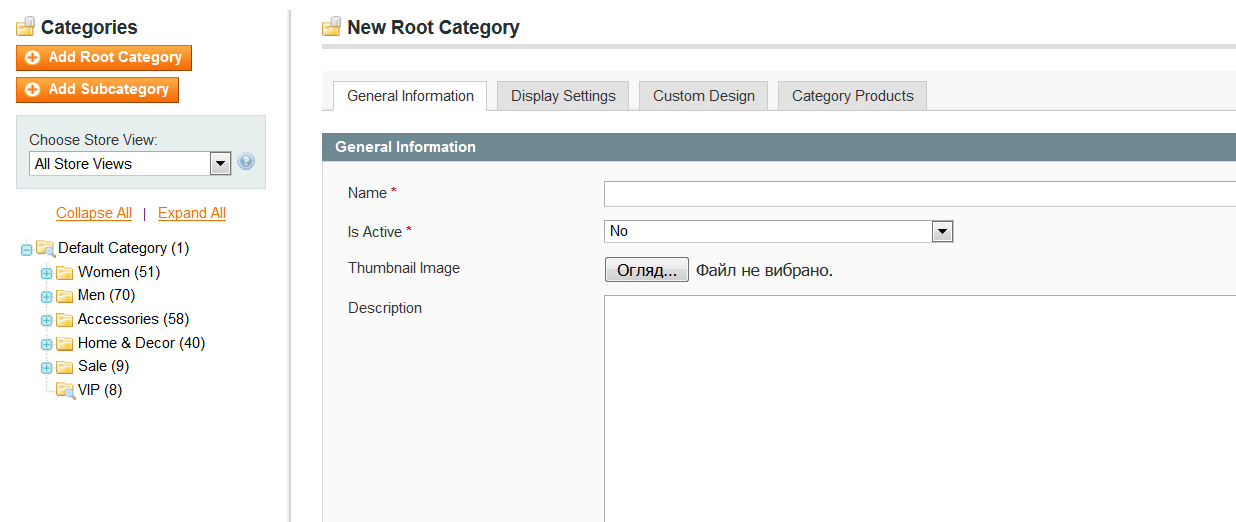
Second, check if the Root Category is specified correctly.
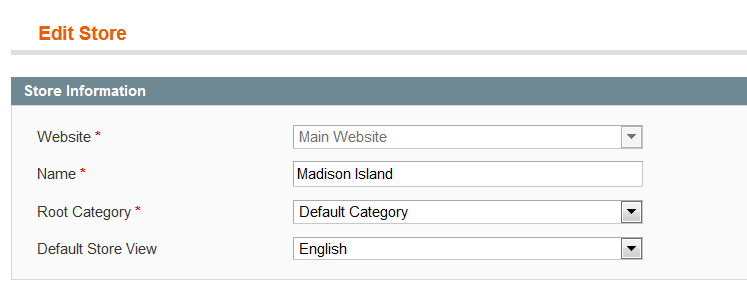
Lastly, you may need to Refresh Cache (System – Cache Management).
Brilliant. Comprehensive. Great article. Can I add just one more thing that I have experienced is that Magento emails sometimes go into the spam folder and don’t reach the client. The problem is that various aspect affect how emails are filtered, from the server and IP configuration to the email’s content and structure. This means that the first step is to accurately configure the domain SPF. I also find that it is a good idea to use Domain Keys Identified Mail or DKIM.
Thank you, Alistar. I’ll include this info during the next revision of the article.
Thanks for sharing such a nice informative blog.
I am always browsing online for tips that can benefit me. Thank you!
I am facing an issue with my purchase code. I am not able to connect it to my domain. It says that he purchase code is connected to some other domain. But I have only 1 live domain . Can some one help me solve this? How should I know which domain is active on the purchase code and how do I disconnect it and connect it to my domain?
Please ask the vendor of your extension. Usually, vendors are those who manage code-domain relation. So find out their support contacts, provide your order number and your domain and ask to change the relation.
Well I really liked reading it. This article offered by you is very practical for proper planning.
Thank you!